
Are you planning to move your WordPress site to a new hosting company or a different server?
Moving your WordPress website to a new host can be a complex task, but it doesn’t need to be. The biggest risk when switching web hosting or migrating a website to a new server is data loss and downtime. Migrating to a more reliable host is delayed time and again for fear of making a mistake and damaging your site(s).
However, there are important steps to migrate your WordPress site if you follow our guide you can succeed. Are you ready? Let’s run through the steps required to move your WordPress website to a new host, but before we get started showing you how you can migrate your site.
Many of the best WordPress hosting companies will actually move your site for you, so if you have just purchased a new hosting plan and are looking to move your site check with your new hosting provider first to see if they offer free migration.
For reliable shared hosting, we recommend going with Bluehost.
Note to Readers: This article may contain links from our partners. We may receive a commission for purchases made through these links at no extra cost to you.

(Image: © Bluehost)
Step 1: Backup Your WordPress Files Manually.
Backup via cPanel
This is so easy, here’s the procedure:
- Log in to your web host and navigate to cPanel (If you are using Bluehost, you will need to be logged in to your Bluehost Control Panel).
- Open to the File Manager, which should lead you to your public_html or Home directory.
- Locate your WordPress directory, the folder you want to backup.
- You can’t download the WordPress folder in File Manager without first compressing it.
- Click on your WordPress directory, and select Compress from the menu bar or right-click on the folder and choose Compress from the drop-down options menu that appears.
- Choose the compression type e.g. ZIP, Tar, GZIP, etc. from the dialog box that opens. We always recommend going with a ZIP archive.
- Then press the Compress File(s) button and wait for the process to run its course. Your server will save your compressed WordPress folder.
- Click on the archive you just created and choose Download from the menu or right-click on the archive and choose Download.
- Choose a secure location on your hard disk and save your backup.
And it’s done!
Step 2: Backup Your WordPress Database Manually
Now let’s back up your WordPress database.
Navigate to your hosting panel and locate phpMyAdmin. It’s for cPanel users it will be located under Database Tools:
Anyway, depending on your hosting it may be located elsewhere. For example, WP Engine users can locate their phpMyAdmin from the main user dashboard by clicking on the icon next to your installation(s):
Once you log into phpMyAdmin you should see the main administration panel:

Select the Databases tab to list your databases.
From your File Manager, navigate to your WordPress directory and locate the wp-config.php file. Right-click on the file and choose the view. In the window that opens, you want to locate this line:
define('DB_NAME', 'database_name'); Your database name is the value contained in the second set of single quotation marks, which is ‘database_name’ in our example above. Locate your database in phpMyAdmin. Click on the database to open it, see below:
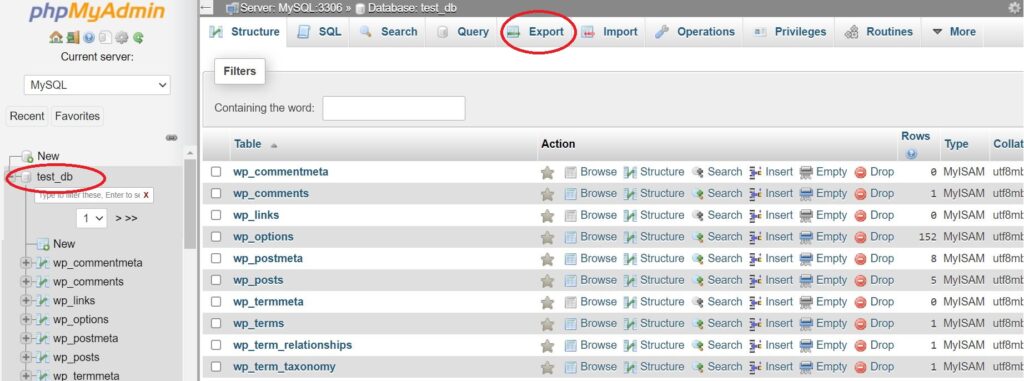
Select all the tables you’d like to backup by ticking the checkboxes. Click “Check All” at the bottom to select all at once. Once you’ve selected the tables, click the Export tab. Select the export method, and set format to SQL:

Now, hit the Go button, and save your database in a secure folder on your PC. Remember to save copies in the same locations you saved copies of your WordPress files. Great job!, you now have a full backup of your WordPress site!
Tips: Back up regularly depending on the frequency of posting to your WordPress site.
Newsletter
GET THE LATEST NEWS FIRST
Signup for our newsletter to get the latest news, updates, and reading tips weekly.